How Can We Help?
SURFconext ID mgmt. service in Pure [NL] - setup guideSURFconext ID mgmt. service in Pure [NL] - setup guide
This article has not been updated to the new look and feel in 5.30.0
SURFconext, provided by SURF, is a federated identity management service for secondary vocational-, higher education and research in the Netherlands
When setting up a connection between Pure and SURFconext, the following activities are required:
Configurations in Pure
Create an entity in the SP dashboard
1. Configurations in Pure
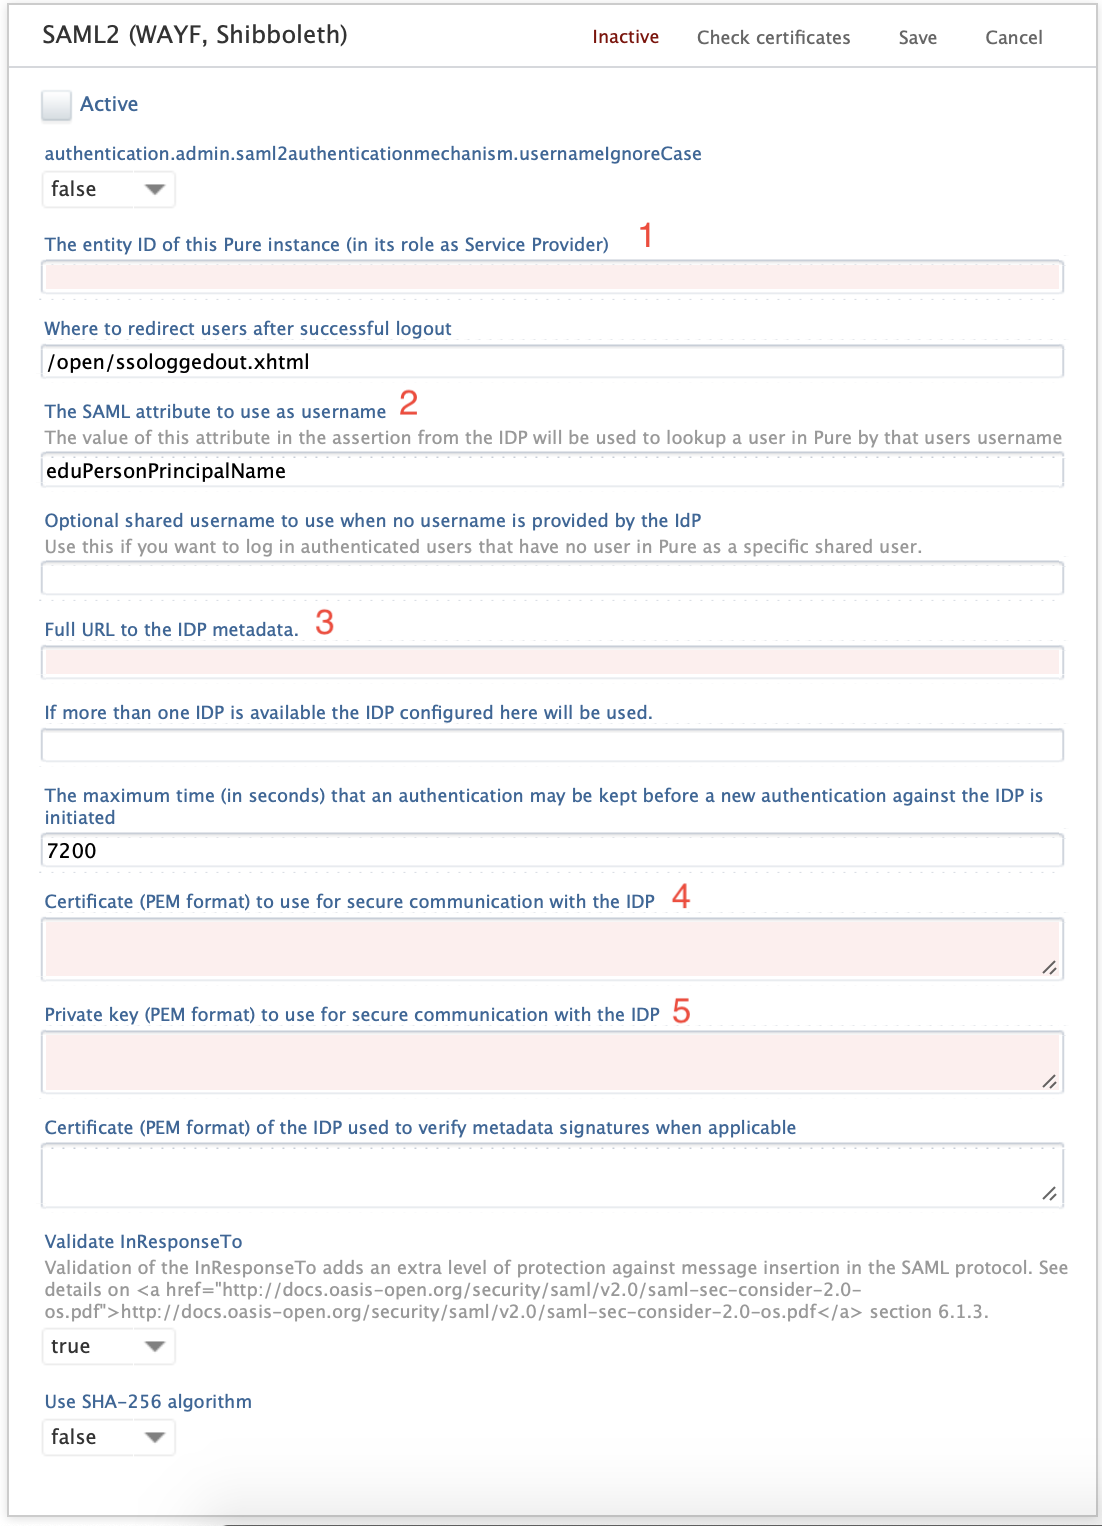
The configurations are done in Pure under Administrator > Security > Admin > SAML2.
Bellow is an example of the filled out settings page. Follow this guide on how to fill out the page.

Description of mandatory fields in the configuration:
1: "The entity of this Pure instance (in its role as Service Provider)": In this field, you fill in the URL for the Pure instance you are setting up the configurations for: e.g. https://research.pure.dk/admin
2: "The SAML attribute to use as username": The value of this field is dependent on which attribute you use as username for authentication: e.g. unique ID or e-mail address.
Some of the most common once are:
- Unique ID: urn:mace:dir:attribute-def:uid
- e-mail address: urn:mace:dir:attribute-def:mail
- Principal name: urn:mace:dir:attribute-def:eduPersonPrincipalName
- employee/student number: urn:schac:attribute-def:schacPersonalUniqueCode
Find the complete overview of all attributes here: https://wiki.surfnet.nl/display/surfconextdev/Attributes+in+SURFconext
3: "Full URL to the IDP metadata": Needs to be set to https://metadata.surfconext.nl/idp-metadata.xml
4 & 5: "Certificate (PEM format)" and Private Key (PEM format)": The Certificate and the Private key are both created as self-signed certification.
Open a terminal on your computer (for MacBook: [CMD] + [Space], and enter 'Terminal' to open the application.
First, generate a private key with the following command:
| openssl genrsa -out key.pem 2048 |
|---|
Then, create a sign request with the folling command:
| openssl req -new -key key.pem -out request.csr |
|---|
- Enter the information required in the Terminal: Country name (e.g. NL), State/Province name, locality name, organisation name, org. unit name, common name (URL for backend of Pure), e-mail name.
- When you get to where you're asked to enter A challenge password, simply press [enter].
Last, generate certificate by running this command:
| openssl req -x509 -days 720 -key key.pem -in request.csr -out certificate.pem |
|---|
Now you have saved two files on your computer. Find Certificate.pem and copy the text into the field called "Certificate (PEM format)", and copy key.pem into field "Private Key (PEM format)"
When you have done your configurations, you can 'Check Certificates' in the top of the configuration screen.
2. Create an entity in the Service Provider dashboard
First, you need to contact SURFconext at support@surfconext.nl and ask for access to the Service Provider dashboard. When you have access to the Service Provider dashboard, you need to create a new entity.
SURFconext has created a step-by-step guide on how to create an entity, please follow the guide below:
- Login to SP Dashboard
- Configure and test your SAML entity/ Configure and test your OIDC entity
- Answer the Privacy questions regarding GDPR (AVG)
- Promote entity to production
When the entity is created, SURFconext will validate the connection, whereafter you go back to Pure: Administrator > Security > Admin > SAML2, and check the box for 'Activate'.
Updated at July 27, 2024
